If your website feels slow to load, images are almost always the reason. A single unoptimized photograph can be 4–6MB straight off a camera. Your entire webpage should ideally load in under 3MB total. That gap is why image compression matters more than most site owners realize — and why fixing it is one of the fastest ways to improve both your Google rankings and the experience for anyone visiting your site.
This guide walks you through exactly how to compress images for web use, which format to save them in, and when compression actually makes a meaningful difference versus when it doesn’t.
Why Image Size Affects More Than Just Load Speed
Page speed is the obvious reason to compress images. But there are three others that directly affect you:
Google Core Web Vitals. Google measures Largest Contentful Paint (LCP) — how long the biggest visible element on a page takes to load. For most pages that is a hero image or banner. If that image is unoptimized, your LCP score suffers, which can push your pages lower in search results.
Mobile users on limited data. A significant portion of web traffic comes from mobile devices, many on cellular connections. A 3MB image that loads in one second on fiber takes 8–12 seconds on an average mobile connection. Most users abandon pages that take longer than 3 seconds.
Hosting storage and bandwidth costs. If you are on a shared hosting plan, unoptimized images eat into your monthly bandwidth allowance faster. Compressing images before upload directly reduces your hosting costs over time.
What Actually Makes an Image File Large?
Before you compress anything, it helps to understand what you are dealing with. Image file size is determined by three things: the pixel dimensions (width × height), the file format, and the quality level. A 4000×3000 pixel photo saved as a high-quality JPEG will be 4–8MB. That same photo resized to 1200×900 and saved at 80% quality might be 180–300KB — and look identical on a normal monitor.
Most websites never display images larger than 1200–1600 pixels wide. Uploading a 4000px image because “it might look better” almost never helps the user, but always slows them down.
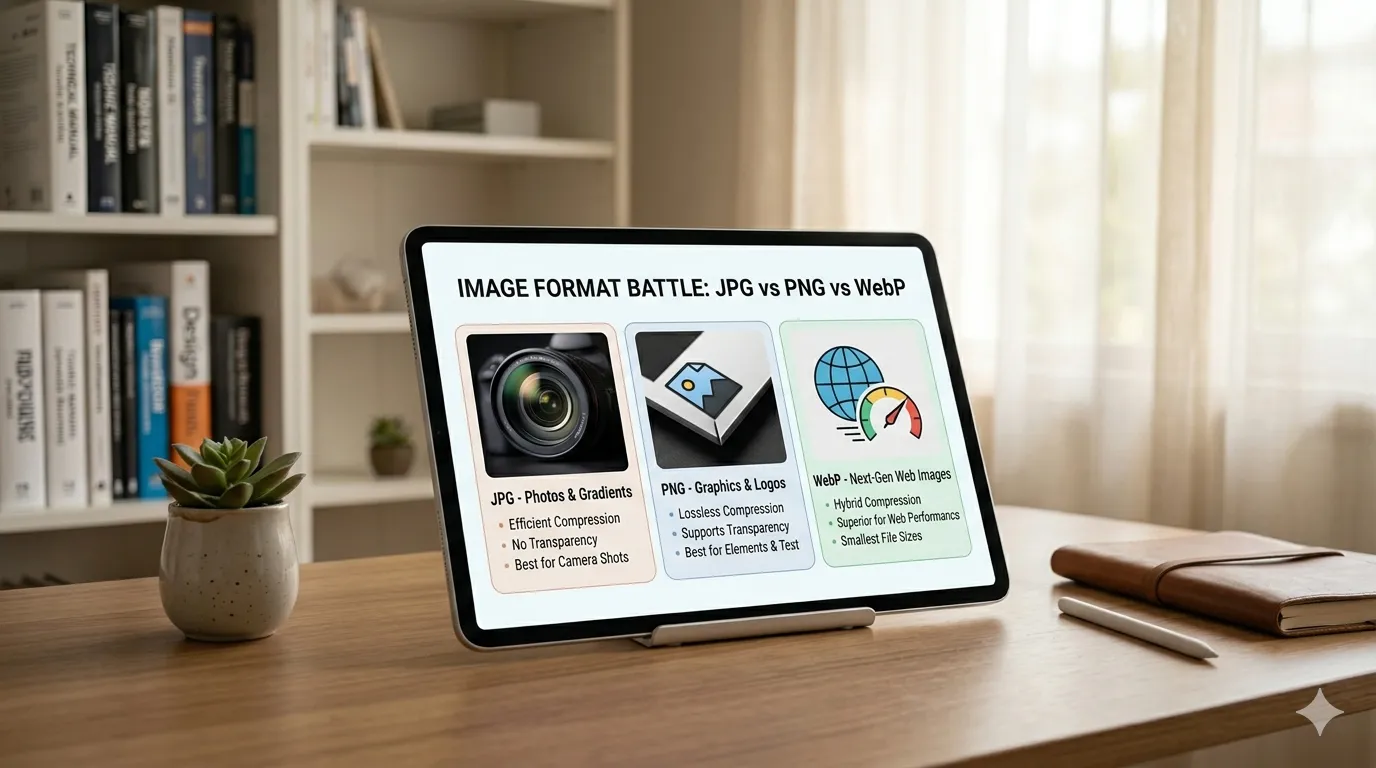
Choosing the Right Format Before You Compress
Format choice matters as much as compression. Here is a practical breakdown:
| Format | Best Used For | Transparency | File Size |
|---|---|---|---|
| JPEG | Photographs, product images | No | Small–Medium |
| PNG | Logos, icons, screenshots | Yes | Medium–Large |
| WebP | Almost anything — modern default | Yes | Very Small |
If you are optimizing for a website in 2025, WebP is the best default choice for nearly all images. It produces files that are 25–35% smaller than equivalent JPEGs at the same visual quality, and all modern browsers support it.
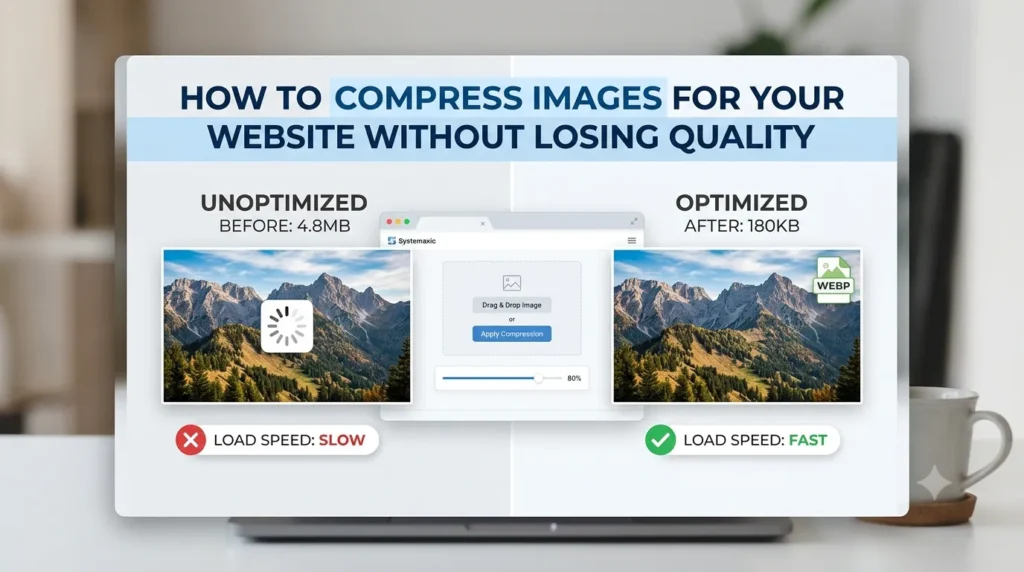
Step-by-Step: How to Compress Images Using Systemaxic
You do not need Photoshop or any installed software to properly compress images for web. Here is how to do it directly in your browser:
- Open the Systemaxic Image Resizer tool
- Upload your image — it works with JPG, PNG, WebP, GIF, and BMP
- Set the width to your target size — 1200px wide for blog post images, 600px for thumbnails
- Enable “Maintain aspect ratio” so the height adjusts automatically
- Under Output Format, select WebP for the smallest file size, or JPEG for photographs that don’t need transparency
- Set quality to around 80–85% — files get significantly smaller but the visual difference is barely noticeable
- Download your optimized image
Practical tip: Run a before-and-after test on one image first. Open both versions side by side at 100% zoom. If you genuinely cannot see a difference, your compression settings are correct. If you can see obvious blurring or blockiness around edges, increase the quality setting by 5 and try again.
When Compression Makes the Biggest Difference
Not all images compress equally. Here is where you will see the most dramatic results:
- Camera photos uploaded directly — these are almost always 3–8MB and compress to under 200KB easily
- Screenshots — converting a PNG screenshot to WebP typically cuts file size by 60–70%
- Product images on ecommerce sites — resizing from 3000px to 800px and converting to WebP can reduce a product gallery from 40MB total to under 3MB
When compression won’t help much: If your image is already a small JPEG under 100KB, compressing it further will damage quality without meaningful file size savings. Over-compressing creates blocky, blurry images that make your site look unprofessional. Know when to stop.
A Note About Retina Screens
Modern devices like iPhones and MacBooks have retina displays that show images at twice the pixel density. If you want sharp images on those screens, save images at 2× the display size (e.g., 2400px wide for a 1200px display slot) but compress the quality heavily to compensate. This keeps file sizes manageable while the image still looks sharp on high-DPI screens.
Frequently Asked Questions
Does compressing an image permanently reduce its quality?
Yes — JPEG and WebP compression is lossy, meaning some image data is discarded to achieve smaller file sizes. This is why you should always keep your original high-resolution file and only compress copies. If you compress the same JPEG multiple times, quality degrades noticeably each time. Always compress from the original, never from a previously compressed version.
What is a good target file size for web images?
For full-width hero images and banners, aim for under 300KB. For blog post inline images, 50–150KB is ideal. For small thumbnails and icons, under 30KB. These targets balance visual quality with fast load times across all connection speeds. If your image cannot get below these numbers without looking bad, the dimensions are probably still too large — try resizing down first before adjusting quality.
Should I compress images before or after uploading to WordPress?
Before uploading is always better. WordPress generates multiple image sizes automatically when you upload, and if your source image is already optimized, all those generated versions will also be smaller. Compressing after upload using a WordPress plugin like Smush works too, but it processes images one at a time and often does a less thorough job than dedicated browser-based tools. The safest workflow is: compress externally first, then upload.
Does image compression affect SEO?
Indirectly, yes. Google does not directly reward compressed images as a ranking factor, but page speed is a ranking factor — and images are the primary driver of slow page speeds. Faster pages rank better, have lower bounce rates, and improve Core Web Vitals scores. So while the compression itself is not the SEO signal, the performance improvement it creates absolutely is.
Ready to optimize your images? No signup required — just drag, resize, and download.
Use the Free Image Resizer & Compressor →